I’m beginning a new course called Photoshop for Photographers: Compositing. In Lesson 1, I combined the expressions from two images.
Started with this image…
I made the bride smile by creating a mask and painting over the original layer and cropped the image and straighten the image…
In Lesson 1, I combined two frames to improve the overall image.
Started with this image…
Then I masked these two images, and made the background a bit of blue and yellow…
I used Photomerge and masking to create a better group portrait.
Started with this two images…

I merged these two images and use my Brush tool to paint over the girl in the middle to look at the camera…
In Lesson 2, I combined two frames together with masking.
Stated with this image…
I moved the image to the left side, flipped the image horizontally, and masked the image onto the background…
I applied the finishing touches and making creative adjustments.
Started with this image…
I made the background and subject a little red and yellow and made an effect that the subject is fading out a little…
In Lesson 2, I removed the subject from location.
Started with this image…
I selected the subject and moved her into the lake background…
I changed the scale of the subject.
Started with this image…
I resize the subject and placed her right in the middle of the frame…
I created realistic shadows.
Started with this image…
I created the subject’s shadow and brought down the opacity to make it look realistic…
In Lesson 2, I added a creative effect.
Started with this image…
I deleted some layers, added shadows under the subject’s feet, added a lens flare effect, and made the shadow a tint of blue…
I relocated the subject.
Started with this image…
I moved the subject on the ledge, reposition him facing the city, crop one of the ventilation vents and erase part of the subject’s background…
I worked on shadows and color.
Started with this image…
I clipped my Curves and Hue/Saturation adjustments to the fiddler layer, added a Photo Filter and Levels adjustments, and added a shadow under the fiddler’s shoes…
I watched an inspirational sneak peek into the layered file of a compositing guru. In Lesson 3, I improved composition with symmetry.
Started with this image…
I refined my subject and painted the wall away with the Brush tool…
I cleaned up the details of the image
Started with this image…
I clean up the background a little…
In Lesson 3, I enhanced color and tone.
Started with this image…
I made the picture a black and white image with a sepia tone…
I extended the background.
Started with this image…
I copied the background, use the Lasso and Rectangular Marquee tools to extend the background, and clean up the background with the Clone Stamp tool…
I cleaned up the image and made some final adjustments.
Started with this image…
I extended the background even more and added two Curves adjustments to have little yellow and red…
I masked together multiple exposures.
Started with this image…
I masked this two images to have whole deer head in the picture…
I filled in the gaps in the background.
Started with this image…
Then I painted in the fireplace with the Clone Stamp tool…
In Lesson 3, I finished the background.
Started with this image…
I filled in the background with the Clone Stamp tool and made some areas lighter as the rest with lower Opacity…
I made some final adjustments to the image.
Started with this image…
I cleaned up the background with the Spot Healing Brush, and cropped the image…
In Lesson 4, I painted in light.
Started with this image…
Then I painted the creek, grass, trees, and the house with the Brush tool…
I brighten up the exposure.
Started with this image…
I brighten up the house and the field, and added Vibrance and Curves adjustments to the image…
In Lesson 4, I added interest by masking in exposure.
Started with this image…
Then I brighten the house and background with low Opacity and the Brush tool…
I corrected overexposure.
Started with this image…
I brighten up the room and panic table with a mask and used a Curves adjustment…
I corrected overexposure with Color Range.
Started with this image…
I added a mask and painted the roof and trees to darken them up…
I added a candlelight and enhancing color and tone.
Started with this image…
I copied the candle on the right and placed it over the candle on the left and added Selective Color, Curves, and Vibrance adjustments to the image…
In Lesson 4, I combined interior and exterior exposures of an office with windows.
Started with this image…
I made the windows the same and made the office a lot brighter with a layer mask…
I masked in multiple light sources in an interior.
Started with this image…
I added layer mask to brighten up the left wall, carpets 1&2, and benches 1&2…
In Lesson 5, I combined two exposures for the foreground and sky.
Started with this image…

I aligned the two layers to get the detailed sky and made the rails brighter and the background darker with with low Opacity…
I filled an ordinary, plain blue sky with interesting clouds.
Started with this image…
I selected the sky with the Quick Selection tool and have one of the cloud layers in the sky…
I experimented with different cloud options.
Starting with this image…
I decreased the Opacity of layer Clouds 1 and added Color Balance and Hue/Saturation adjustments…
I used advanced masking to create a more subtle look.
Started with this image…
I added a new mask layer to soften the clouds in the background…
In Lesson 6, I blended a sequence of images together.
Started with four images…


I copied the second image, Used the Brush tool to paint them in on a layer mask, and lower the Opacity on three of the four images…
I cropped and finished the image sequence.
Started with this image…
I cropped the image, clean up the image with the Spot Healing Brush, and used a Color Tone adjustment…
In Lesson 6, I builded the background.
Started with this image…
I moved the background, clean up the image with the Spot Healing Brush, and added part of the wave from a different layer with a layer mask…
I masked in the action.
Started with this image…
I masked in some parts of the action with the Brush and Lasso tools…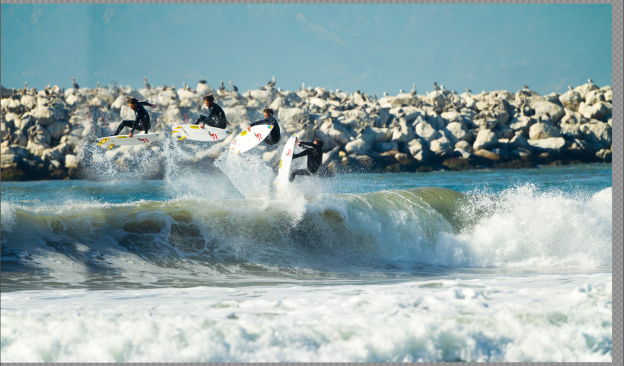
I cropped and finished the image sequence.
Started with this image…
I added another action sequence, cropped the image, added a Levels adjustment, and deleted layers I didn’t use…
In Lesson 7, I cleaned up the background.
Started with this image…
I moved the Screw layer onto the bottom of the lightbulb and cleaned up the image with the Brush tool…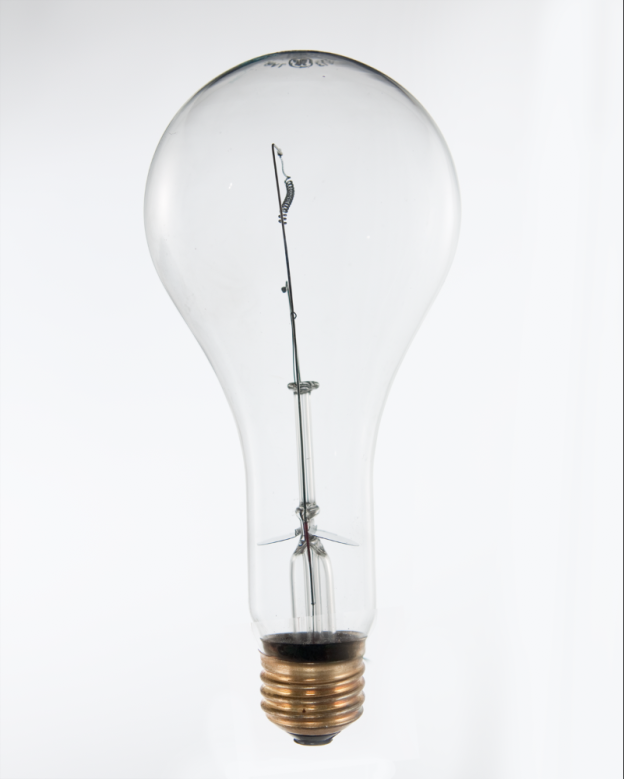
In Lesson 7, I cleaned up the light bulb.
Started with this image…
I got rid of the inside of the light bulb and also the brand at the top with the Clone Stamp tool…
I added the tree.
Started with this image…
I added the stick and tree into the lightbulb, removed the tree’s bark, and changed the color to green…
In Lesson 7, I created reflections.
Started with this image…
I change the shade of green on the tree, I added reflections above and below of the tree…
I sharped and added final adjustments.
Started with this image…
I added a Black & White and Curves adjustments…
In Lesson 7, I masked in the subject into the scene.
Started with this image…
I selected the subject with the Quick Selection tool. And moved the subject where she can sit on the beam of the sail…
I builded shadows to the image.
Started with this image…
I made shadows on the boat by the leg, by the subject’s shoulder, and under her hand using the Lasso tool…
I made the final color and tone adjustments to the image.
Started with this image…
I added an Black & White, Color Balance, and Curves adjustments to the image…
I positioned the subject and added rope to the image.
Started with this image…
I positioned the subject on the side of the can. And added rope to the bottom and to the top…
In Lesson 7, I connected the rope to the can.
Started with this image…
I made the rope go around the tab of the can and made a knot in the rope with the Move and Brush tools…
I created a reflection and a shadow.
Started with this image…
I made a reflection on the can showing the subject and the rope and lower the Opacity…
I added the final shadows and sharpening to the image.
Started with this image…
I added a rope shadow at the bottom of the can, added some shadows under the subject’s feet, added a Hue/Saturation adjustment layer, and sharpened the image…
Finished the Photoshop for Photographers: Compositing course on Lynda.com.
